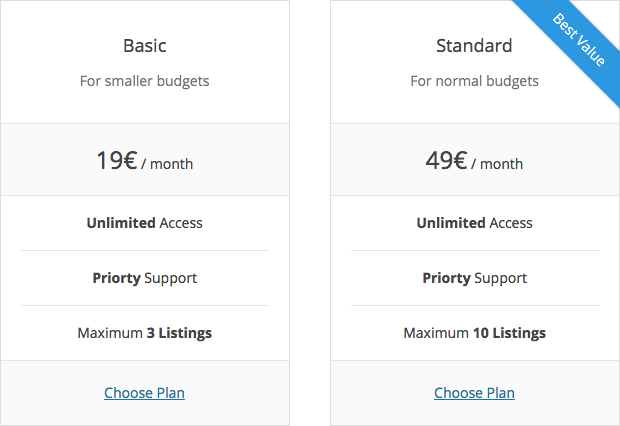
When this plugin is activated a new post type for pricing tables will be created. Through a set of custom meta boxes you can add your pricing tables with different plans and use a shortcode to display the table on your WPCasa website.
Install Add-On
Please keep in mind that this plugin is an add-on for WPCasa. That means that you need to install the WPCasa core plugin first.
Once WPCasa is up and running you can install our WPCasa Pricing Tables add-on. Please go to WP-Admin > Plugins > Add New and type “WPCasa Pricing Tables” in the search field. Click Install Now once you’ve found the plugin and activate it.
Create a Pricing Table
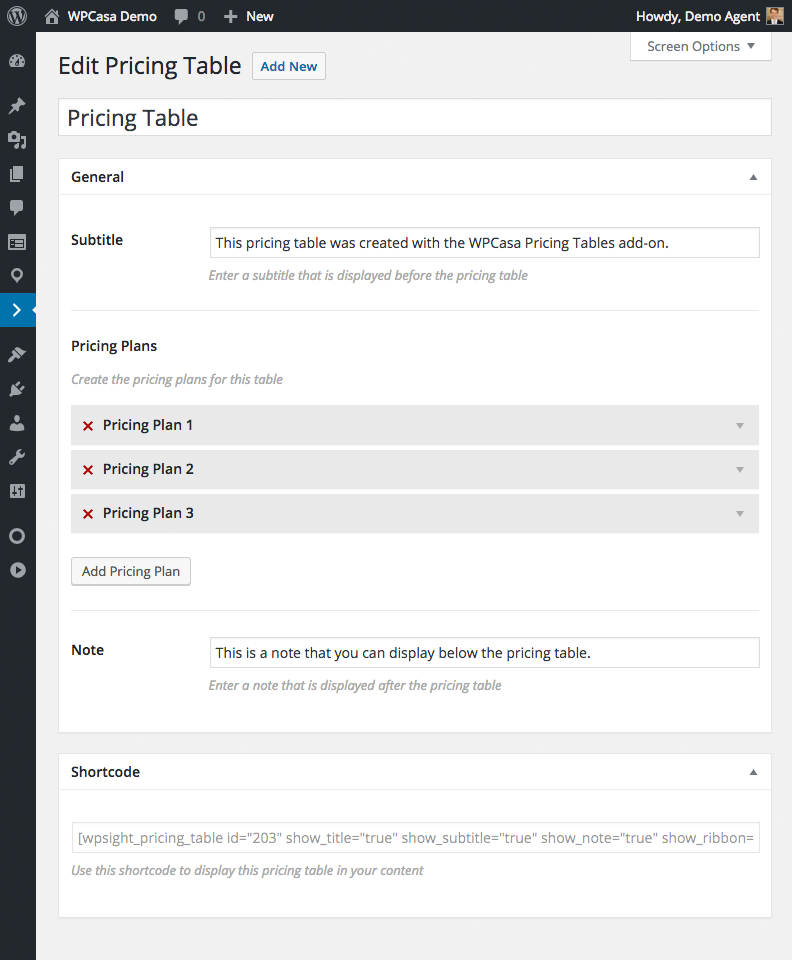
Creating a pricing table is dead simple. Once the add-on is installed you will find a new item Pricing Tables in the WordPress admin menu. Click on Add New.

On the pricing table edit screen you can add the details about your pricing model.
Title
Here you can enter the main title of the pricing table. It serves to identify the corresponding table and will be displayed before the pricing plans. Optonally you can hide it by setting the corresponding shortcode parameter to false. We will see that later.
Subtitle
The subtitle (probably to your surprise) will be display below the main title before the pricing plans.
Note
The note will be displayed as muted text right below the pricing plans. Here you can put something like “You can cancel any time.” or something like that.
Pricing Plans
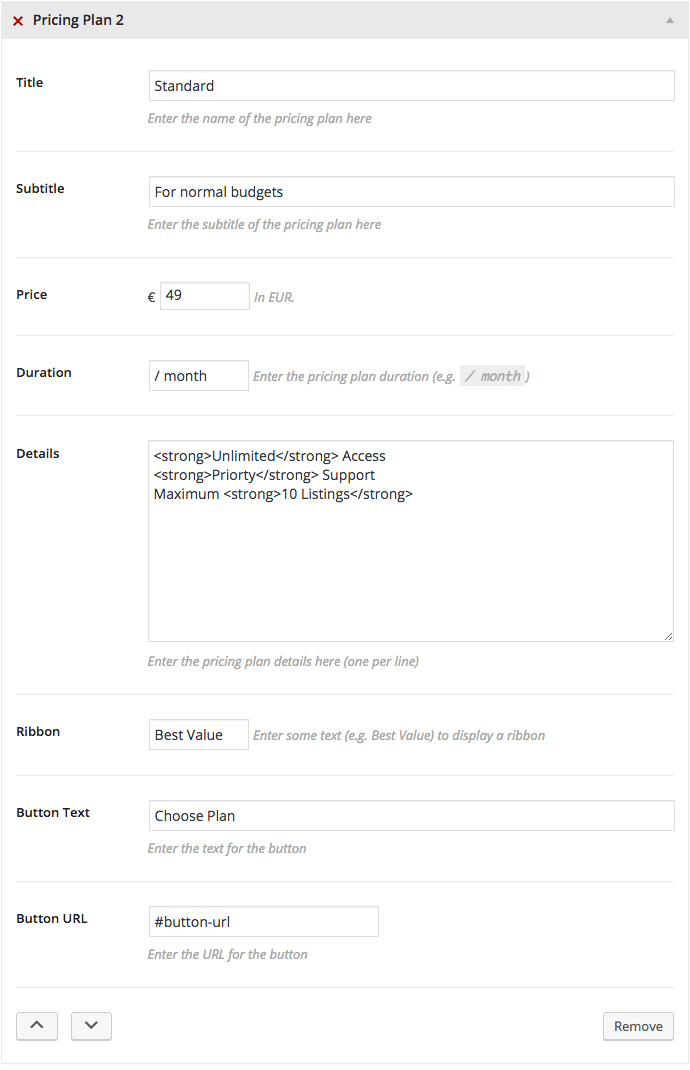
Here you actually create the different plans you would like to offer.

Title
Here you enter the main title and name of the pricing plan.
Subtitle
The subtitle should be a short note along with the plan title.
Price
A pricing plan should include a price. You can enter it here. The currency is set through the main WPCasa settings.
Duration
If your price is time-limited you can set the duration here (e.g. per month).
Details
The pricing plan details can be entered here. You can use basic HTML here and add one detail per line.
Ribbon
Enter a short text (e.g. Best Value) to display a ribbon for the corresponding pricing plan.
Button Text
Here you can set the button text. It defaults to Choose Plan. Change it to your needs if necessary.
Button URL
Here you enter the URL the pricing plan button is linked to. This can be a page with additional information, your registration form or any other type of conversion.
Package
This option will be displayed when you have the Dashboard add-on (from version 1.1.0) activated on your site. When a package is selected the button URL will be ignored and the button points to the payment form with the coresponding package information.
Display a Pricing Table
To display a pricing table in your content you can use the shortcode that is displayed in the second meta box of the edit pricing table screen.

Just copy the shortcode and place it in your post, page, widget or any other content area. Using the shortcode parameters you can also adjust a few things. Set any of the parameters to false if needed.
For example, when you add your pricing table in a static page, it can make sense to hide the main title of the pricing table. In this case the title will probably set through the page title. But of course this is up to you.

Template
The markup of the pricing table that is displayed on the front end of your WPCasa site is defined in a template file. You can find it in the /template folder of the add-on.
If you need to change the template to your liking, you can work with this template file. Please have a look at Using Templates for more details.
Filter Hooks
For further customization the add-on also comes with a few WordPress filter hooks.
Add-On CSS:
By default the add-on uses some custom CSS for the pricing tables. If you want to use your own CSS, you can use the wpsight_pricing_tables_css filter to deactivate the add-on CSS.
add_filter( 'wpsight_pricing_tables_css', '__return_false' );
Pricing Table Limit:
The pricing table meta box limits the number of plans to a maximum of 4. This is also the maximum number that the -on CSS handles. If you need to add more, you can use the wpsight_pricing_table_limit to set a different number.
add_filter( 'wpsight_pricing_table_limit', 6 );
Also see Using Code Snippets.
Useful Links
Please Notice!
Other articles in Add-Ons
- Activate License Keys
- WPCasa Admin Map UI
- WPCasa Advanced Search
- WPCasa All Import
- WPCasa Contact Form 7
- WPCasa Currency Converter
- WPCasa Dashboard
- WPCasa Dashboard v1.0 (deprecated)
- WPCasa Energy Efficiency
- WPCasa Expire Listings
- WPCasa Favorites
- WPCasa Featured Listings
- WPCasa Gravity Forms
- WPCasa Legacy
- WPCasa List Agents
- WPCasa Listing Labels
- WPCasa Listing PDF
- WPCasa Listings Map
- WPCasa Mortgage Calculator
- WPCasa Ninja Forms
- WPCasa Polylang
- WPCasa Pricing Tables